

First and foremost, RDWHAHB (Relax, Don't Worry, Have A Home Brew). Some sort of beverage is definitely a requirement for this piece, it contains a good deal of information.
This article actually started out with a different name: How I Failed At Kegging. So now you don't have to... Hopefully the mistakes I made while learning how to keg will come in handy and help save you some time. I'll list out, explain and tell you where to get all the parts and pieces you need to start kegging.
Before we begin, if you've read this article and you're still completely lost, talk to your LHBS or look into a Homebrew Conversion Kit from online retailers. It's comparable to the setup discussed in this article.
CO2 tank > CO2 regulator > flare barb (with washer) > hose clamp > gas tubing > (manifold if multiple CO2 lines) > hose clamp > barb > gas disconnect > keg.
Keg > liquid disconnect > flare barb (with washer) > hose clamp > liquid tubing > hose clamp > picnic tap (or faucet).
I'm going to mostly cover the cheap beginner setup, but I will include another list for those that want to go full regalia. That list will be called Advanced Setup. Big shout out to reddit.com/r/Homebrewing community and u/romario77 for providing the majority of the advanced list.
| Keg | $40-90 |
| Fridge (buy used) | $50+ |
| 5 lb CO2 Tank | $41+ |
| CO2 Regulator | $43.99 |
| O-rings (sometimes included with keg) | $3.99 |
| Liquid Tubing 6-10 ft | $10 |
| Gas Line Tubing 3-5 ft | $10 |
| 1/4" Liquid Line Barbs (two for each line) | $3.99 |
| 5/16" Gas Line Barbs (two for each line) | $3.99 |
| Nylon washers (one for each barb) | $2.99 |
| Hose clamps | $5 |
| Picnic tap | $3.79 |
| 2x Disconnect (1x Beer & 1x Gas) | $11.98 |
| PBW or Barkeepers friend | $7.99 |
| Temperature Controller (optional) | $35 |
In addition to all of the above you may want to:
| Item | Price |
| Intertap Beer Faucet - Stainless Steel | $34.99 |
| Intertap Beer Shank | $32.99 |
| Intertap Beer Faucet Self Closing Faucet Spring | $1.99 |
| Tap Handle | $2.94 |
| Taprite Dual Pressure CO2 Regulator | $95.88 |
| 2+ way CO2 Manifold (3 way for 3 or more kegs) | $21.31+ |
| Push to Connect Shank Connector and John Guest 3/8" fittings to screw onto disconnects | $2+ |
This article is based on 5 gallon "corny" or cornelius kegs. You probably already know what kind of keg you want so I won't spend much time here.
Two essential keg types are Ball Lock and Pin Lock kegs. There is a nice guide on the differences between the them, but the quick scoop is that most homebrewers use Ball Lock kegs due to their availability, ease of use, and them being an almost an industry standard. In other words, many of the parts for Ball Locks are widely available on the market.
This doesn't mean that Pin Lock Kegs aren't in use - some homebrewers chose those and stick with them. They're usually a little cheaper due to lower demand.
I started out by purchasing a used ball lock keg.
That's what I thought, but apparently these things have a long lifespan. Most of these kegs have previously lived a life as a soda keg and possibly sat in a warehouse for a while. There's nothing wrong with them, and if you purchase them at a well-known homebrew retailer then there's a nice money back or replacement guarantee. My first keg's dip tube was stuck in it, so they sent me a replacement. Be sure to buy a set of O-rings if your keg doesn't come with them (more on these later).
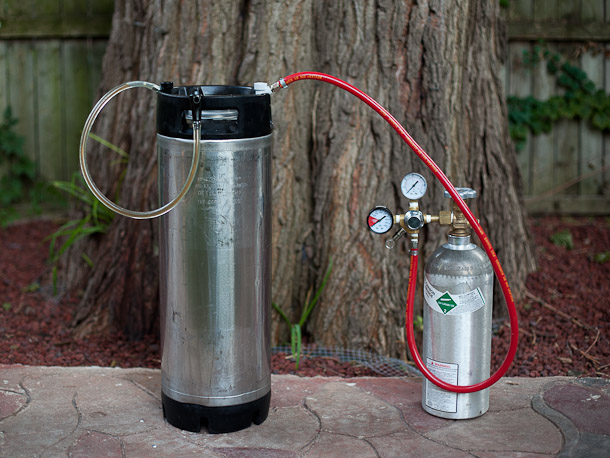 Ball lock keg with a picnic tap hooked up to a regulator
If you haven't yet purchased your fridge, there are a few nice options, and kegging doesn't have to be expensive. I found a used Igloo kegerator on Facebook Marketplace after scouring Craigslist for months and having 3 sellers bail on me in the process. It was definitely a process for me, but in the end my kegerator cost me $120 and came with a regulator and CO2 tank.
If you are still deciding on which refrigeration unit is best for you, here's a nice chart of how many kegs some of the fridges and freezers can fit: chest freezer specs and layouts.
My kegerator is a bit limiting since I only have one faucet (tap) - any more than that will require me to drill some holes in my tower and make managing the beer lines in that tower a bit cramped. Good thing is I can fit a second 5 gallon (corny) keg inside my tower, and then equip it with a picnic tap. This is a wonderful and an inexpensive option.
Many homebrewers just purchase a freezer so they can fit more than 2 kegs in there and often modify it to add faucet taps in there.
Keezer (freezer that's been converted to a keg fridge) is a nice solution. All you need is a freezer unit and one of these:
And you have yourself a keezer. I know a few long-time homebrewers that have been using this solution with picnic taps and no modification to the unit for a long time. The freezers run about $100 at most local Hardware Stores and the picnic taps are less than $5.
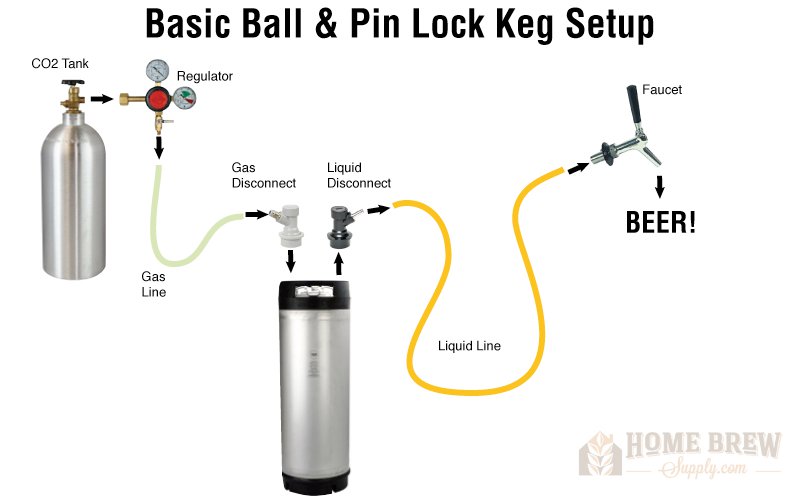 Kegging Setup, credit Homebrew Supply
A CO2 regulator is what will control the amount of CO2 that's being dispensed into the keg. It usually has a +/- knob or a screw on the front to control how much pressure to dispense and a shut off valve right below. The on/off switch is often used to make sure the regulator is well-tightened has no leaks.
Tip: test your regulator for leaks by closing the shut off valve, turning on the CO2, setting the pressure in the regulator to about 10-20PSI (top gauage). Then turn off the CO2 and let it sit for a few hours. If your pressure drops during this time like mine did, there is a leak somewhere. Make sure all of your connections are tight and put soap on your connections to see if there's a leak. Thread seal tape helped me resolve my leak.
Possible part: Barbed Swivel nut
Most regulators come with this but mine didn't. The barb swivel nut is there to enable you to fit a tube on the end of the regulator. Make sure this matches your tube size. The barb in the link will fit your standard 3/16" beer line tube.
There are different disconnects and tubing sizes out there and buying them can be confusing.
Standard 3/16" beer line is one of the most common types of tubing. Use it to connect your keg to the faucet or tap. On average, you will need 6 feet for the beer line, and about 3 feet for the gas line. It is food-grade tubing - so be sure you purchase accordingly. You can also use this tubing for the gas line, although some people use a thicker, non-food grade line. This is not required.
3/8" PVC Gas Line. You can purchase this type of line separately, or you can use your beer line - I recommend purchasing different types of lines as gas lines are cheaper and are a different color to differentiate. Whatever you do make sure you then purchase:
1. Right size barb for disconnectsIf you buy 3/16" line for both, make sure your Flare Nut and Barb is 1/4" on both the nut, and the barb sides. The standard disconnect will likely not fit here. Same goes for the disconnect - make sure the gas disconnect can accomodate a 3/16" line.
Disconnects are the detachable pieces that go on your keg. They are different for Ball Lock or Pin Lock keg that you purchased - so look out for disconnects specific to your keg type.
You will need one gas disconnect and one beer line disconnect for your keg. Outside of Ball and Pin Lock disconnect types, there are two different sub types:
Beer and Gas Disconnects
Gray is for Gas
Black is for Beer
If you're thinking about buying the disconnects linked above, you will also need a couple more Nut and Barbs since you cannot attach a hose directly to a screw head. Again, be sure to match up the barb width to your tube width.
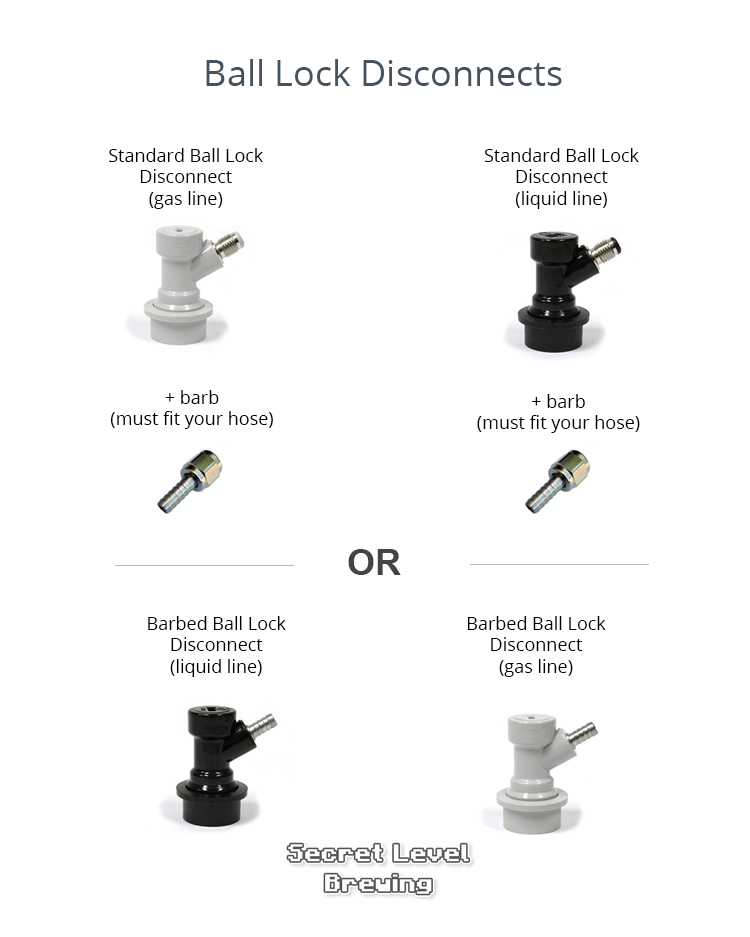 Barbed and Standard Ball Lock Disconnects
I recommend the Standard Disconnect with a detachable barb. This way you can disconnect, reconnect, do close transfers, and makes cleaning easier.
My link to the Standard Disconnects above have two different Swivel Flare Nut + Barb pieces you can purchase as an add-on. You can also get them seperately - 1/4" Swivel Flare Nut x 1/4" Barb. These will fit the liquid line and gas line if you use the same size tubing for both.
Last but not least: you'll need the secure every line attachment with hose clamps so your beer doesn't go spraying everywhere and the tubes don't pop out under pressure.
These Adjustable Hose Clamps fit most lines.
Be sure you have an adjustable wrench on hand, you will need it to unscrew your keg posts to clean the keg. Alternatively, you can purchase one of the following, whichever matches the posts on your keg type. Most Ball Lock kegs need either a 7/8" or a 11/16" wrench/deep socket. Some kegs will have a 12-point post, others have a 6 point, and mine had both.
KP331: Pin Lock 13/16 Socket for removing pin lock posts (plugs) $14.95
KP332: Ball Lock 11/16 SIX-POINT Socket for removing smaller Cornelius posts (plugs) $5.95
KP333: Ball Lock 7/8 SIX-POINT Socket for Cornelius or Firestone posts (plugs) $7.95
KP334: Ball Lock 7/8 TWELVE-POINT Socket for Cornelius or Firestone posts (plugs) $7.95
KP335 Complete Set (THREE BALL LOCK SOCKETS) for Cornelius or Firestone posts (plugs) $21.95
KP336: Set of TWO BALL LOCK SOCKETS, 7/8 SIX POINT and 7/8 TWELVE POINT for Cornelius or Firestone posts (plugs) $14.95
Usually kegs come with O-rings, but if it doesn't, they're pretty cheap and go around your keg posts, as well as the keg lid. Be sure to replace them, especially if you buy a used keg.
Best of luck, homebrewers! It all sounds intimidating at first, but remember - lots of people have gone through this process and there are great communites out there that are more than willing to help. If you're stuck or have some advice to help improve this article, reach out to us using the email below.
